 Contact support
When you build a zap in Zapier, SendOwl can operate as its trigger step. Here's what to know as you start your zap.
Table of Contents:
Introduction
Here are some reasons you might like to use SendOwl as the trigger for a zap in Zapier:
"I want to trigger a workflow each time there's a new order in SendOwl."
"Each time someone cancels a SendOwl subscription, I need that to trigger an action in another app."
Zapier will be your best resource for the process of building zaps. We'll give you some useful SendOwl-related tips here.
What Trigger events are available?
After you choose SendOwl as the Trigger app for your zap, you can choose one of these options:

- New Order: Triggers when an order (free or paid) reaches a Complete status, or a subscription order reaches an Active status.
- New Payment: Triggers when any buyer makes a payment on a SendOwl order. This can be a one-time purchase or an ongoing subscription payment.
- New Refund: Triggers when you issue a refund on any SendOwl order.
- Subscription Termination: Triggers when a subscriber closes their subscription, or the subscription is closed for non-payment.
Note: SendOwl can't be used as the Action step in a zap.
Previewing SendOwl's test data
Once you've chosen an event, Zapier will prompt a test, to make sure it can communicate with your SendOwl account.
In that test, Zapier will access the 3 most recently-completed orders from your SendOwl account. That test data will look something like this:

- The purple fields are available data fields from SendOwl, though you might not have your account configured to capture them all.
- Next to some of these fields, you'll see test data pulled in from your order. This is how you can verify that order details are being pulled into Zapier.
Zapier won't have access to all SendOwl data in this test step. You'll see enough data to verify the connection between the two apps.
Don't worry! You'll have access to more SendOwl data in the Action step.
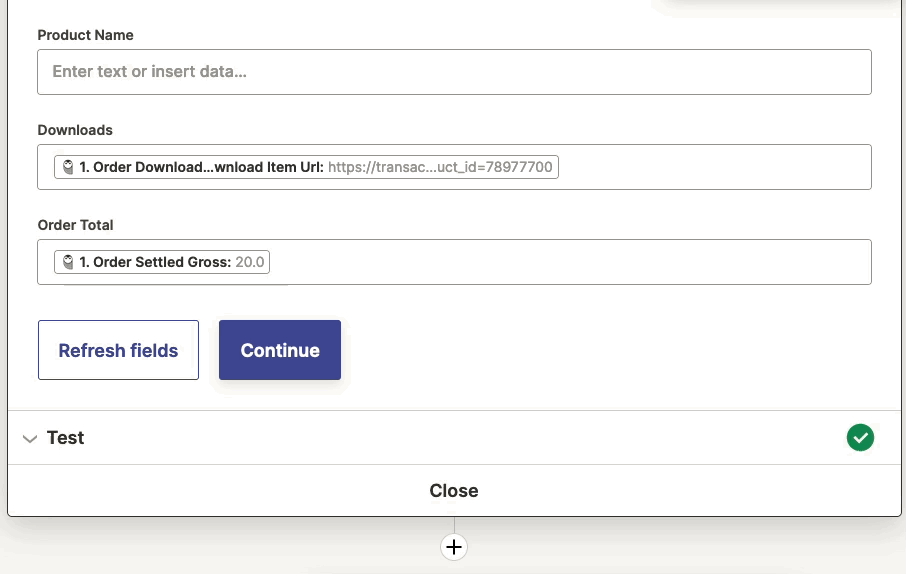
Mapping data fields in the Action step
Once you've chosen an app for the Action step of your zap and tested that connection, you're ready to "map" some data fields.
This means you'll pair data from SendOwl with fields in your other app. That way Zapier knows which information to place where.
In this example, we're connecting SendOwl to Google Sheets, so each new order in SendOwl adds a new row to our tracking spreadsheet:

Once we've connected Google Sheets to Zapier, the column titles from our spreadsheet will appear in Zapier as fields (Order ID, Buyer email, and so on in the sample above).
Then we click each of these fields and we'll see a list of all the available data from SendOwl. Then we can choose the one we want for this column of our spreadsheet:
If you're comfortable with code, and you need more flexibility with how you move data between your apps, you might prefer to create some webhooks in SendOwl.